This article is intended for use with UNMANAGED Dedicated Servers. If you are a Managed Dedicated server customer, please contact KnownHost Support for assistance!
Supported Operating Systems
KnownHost’s dedicated server line supports an abundance of proper Operating Systems but we also know you may need something different or even niche for that one special project.
We’re pleased to offer netboot.xyz, an easy way to try and install a wide variety of Operating Systems on your dedicated server.
Below are instructions on how to boot your dedicated server into netboot.xyz. Please be aware if you choose to install an operating system using this method, you will have to manually configure your network connections, drive partitions, and other aspects that are automated by our other install choices. As such, this is an advanced user tutorial.
All of the information for your network connection can be found in your Synergy Dedicated Control panel, it looks like this:
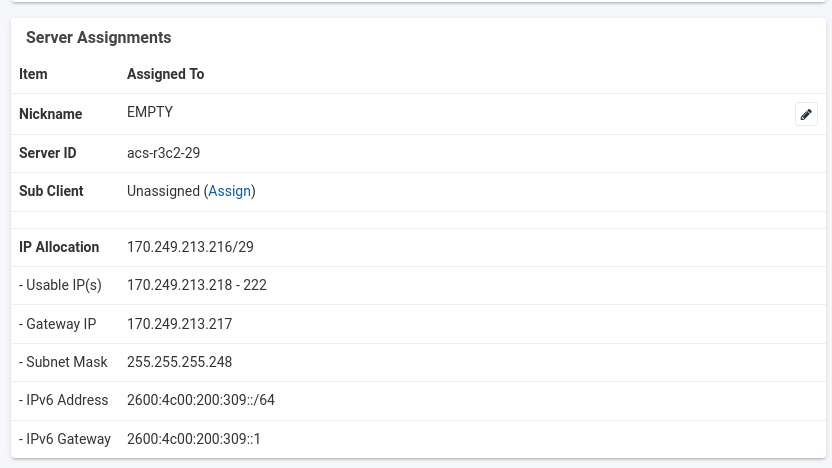
Be sure to make note of your specific server’s information as you’ll most likely need it in a future step.
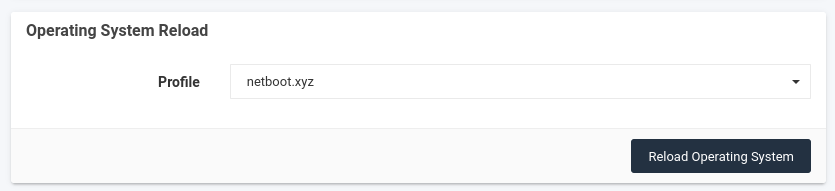
When you’re ready, go to the OS Reload option, and select netboot.xyz from the dropdown menu of OS selections and click ‘Reload Operating System’
You’ll then receive a password prompt and be asked to confirm you understand your server’s disks will be erased.
Because we’re first booting your server into netboot.xyz, this password is not used and you do not need to notate it anywhere.
You will need to click the checkbox confirmation, however, it’s important to understand, just booting into netbox.xyz will not remove data from your server; however, install or other actions within netboot.xyz has that capability.
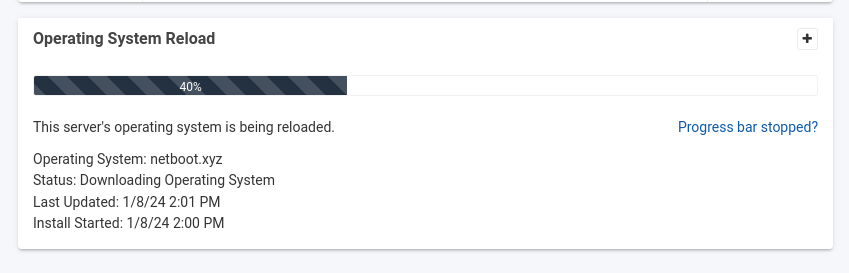
You’ll then see the OS reload status update and you’ll now want to connect to your server via IPMI KVM so you can interact with it directly.
KVM DIRECTIONS HERE
Once connected to your server, you should see it start PXE booting and connect to the network. Under certain circumstances, you may need to select the network boot function within the BIOS, however, this is uncommon


Once your server has connected to the network and started netboot.xyz, you will be presented with the netboot.xyz menu
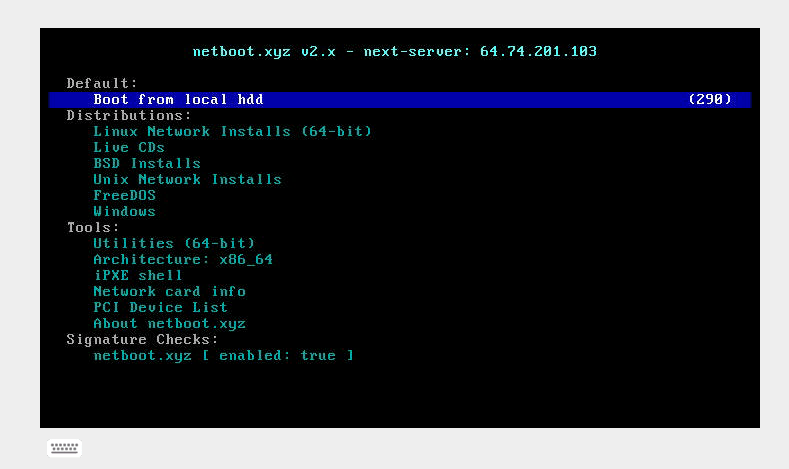
You can then proceed to choose your desired OS, Live Disk, or other function and then follow the steps on screen to install it. The steps may vary widely depending on your OS choice, so we won’t go into much detail here, however, things to remember:
– Your server most likely has two network cards (NICs), the first one is your public interface, the second is your private network interface. Your IP information for both are listed in your Synergy Control Panel, just be sure to configure them accordingly.
– You can either use a public DNS server or KnownHost’s internal private one, its IP is 10.254.254.251 (this will only work for your server’s network setup)
– You will need to set any desired disk partitions and root passwords or credentials during the setup sequence after you choose an OS. Be sure to make note of these.
Once you’ve finished installing your desired OS
Once you’ve finished installing your desired OS, you’ll want to reboot your server and boot it directly from your hard disk to boot into your new OS.
You will also need to complete two last steps in your Synergy Control Panel to let the system know you’ve finished and to prevent your server from inadvertently booting back into netboot.xyz.
1. On the OS Reload Progress section, click “Progress Stopped”
2. On the next screen, make sure ‘Restart Installation” is not checked and click ‘Stop Tracking’.
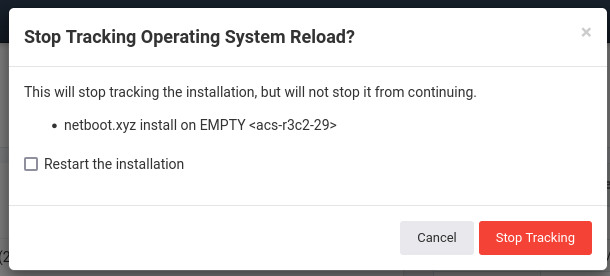
This will not change or stop the OS you installed, but let Synergy know you’re finished with netboot.xyz


